The new year hasn't started yet, but I'm already busy pursuing my good intentions for next year : more sports, less calories, more fun , etc..
I have just baked a wonderful pie dish with a rich and moist filling of chicken, leek, smoked bacon, cream, wine and a bit of garlic and an onion.
Here's the dish , just out of the oven.
And it's only half the calories of the 'fat' version and just as tasty . The secret is of stir frying the vegetables in a wok with very little oil, using light cream and using crumpled sheets of filo dough ( the paper thin one ) coated with a very small amount of oil to cover the dish instead of the usual puff pastry made of wheat flour and butter, which is tasty but very heavy.
And this is how it looks on a plate. Believe me : it tasted just as good as it looks :). I couldn't believe this had so many less calories in it.
Filo (or phyllo ) dough was easier to work with than I thought.
The sheets are paper-thin and don't stick together , but when you take it out of the package and roll it open it does dry out in minutes and cracks, so best keep it covered with foil till you use it or use it immediately.
Have a great end of year and see you all next year !
Showing posts with label Food. Show all posts
Wednesday, 30 December 2015
Sunday, 2 February 2014
Three ways to preserve your cloves : garlic tsukemono.
At the end of summer till autumn ( July till October ) garlic is harvested.
It's one of my favourite herbs since forever, but I always have to throw away bulbs because they've gone bad or started to sprout.
That is , until I discovered tsukemono (literally : 'pickled things') : the japanese art of pickling vegetables and herbs. I'll be describing my three favourite recipes here.
Get the best dried garlic you can find : it'll be worth it in the end.! Preferably around autumn, when the harvest is, although you can buy good garlic all year round these days.
The first recipe is 'Ninniku Hachimitsu-zuke' ( Garlic in honey )
Use about 7 medium bulbs ( around 300 grams) of garlic
and about 250 grams of honey. I used Hungarian acacia, a liquid honey with a light taste.
You can try any honey you like , but a clear liquid one is easier to pour.
Don't EVER heat honey in the microwave to pour it, it will heat unevenly and start to lose its taste and flavour. Honey should be heated in hot water of about 40 degrees C , which is slow but won't affect the taste and flavour. When honey is heated to over 45 °C flavour and taste ( and the enzymes in the honey) are being damaged.
Separate the cloves, cut off the root ends and peel them completely. No need to remove the core.
Look for a glass jar that will hold all your cloves and sterilize it.
I always use an empty jar from honey (500 millilitres) like the one in the picture above and sterilize it and its plastic top at 110-120°C in the oven for 20 minutes.
Always put the jar and the screw-top in the cold oven before heating it up, so it has less of a chance to break. You can safely put a plastic top upside down in the oven too : at 120 °C it won't melt. Don't EVER screw the top on the jar : when the air in the glass jar heats up, it will push against the top and will deform it !
Take the glass jar from the oven and put it on a cloth or a wooden board so it won't break.
Pour a few litres of boiling water over your peeled cloves, to disinfect them. Make sure your hands
and all your equipment are completely clean !
Pat the cloves dry with a paper towel and put the cloves in the glass till it is full.
Pour the honey in , the cloves will start to float.
Shake the jar , so the honey flows all the way to the bottom.
Leave a little space at the top , so it doesn't overflow when you close it.
Ideally , when you screw the top on, very little air is left underneath the top.
Put the jar in a dark and cool place or in the refrigerator. It's best to put it on a little tray, because after the first weeks , the tsukemono will ferment and produce some gas, and some of the honey may drip over the edge.
Unscrew the top to let it out , once a week. I have on occasion forgotten this and only let it out after a month with no problem ,but the top was bulging and some honey had come out.
After a month, you can start using this garlic in your recipes.
It will taste a bit of honey , but still taste a lot like garlic, and it will not spoil.
The honey will become a bit darker and garlic flavoured. Mix a spoon in hot water , it's a wonderful drink on cold winter mornings.
Over time , the honey flavour of the cloves will get stronger and the garlic taste will become less strong.
Just to see what would happen, I once left a few cloves at room temperature in honey in the dark for a year.
The honey became quite dark, but was still tasty.
and the cloves had a very sweet honey taste with a hint of garlic , almost like candy.
The second recipe is 'Ninniku Shoyu-zuke' ( garlic in soy sauce )( and vinegar)
Use 7 to 8 medium bulbs ( or 10-12 smaller ones ) of the best garlic you can get and trim off the stems with a sharp knife. don't break them off : you could damage the cloves or break the bulbs.
Peel the skins off , carefully till only one skin remains. Don't worry if some final skin comes off or a bit of two layers remain ! Inspect you bulbs well and reject any that have damaged cloves.
Find a glass pot in which the bulbs will fit close together, otherwise you need too much soy sauce, and sterilize your glass jar and the jar top in the oven ( see above for the details).
This one is a perfect fit for seven bulbs with one on top.
I'll be using the leftover bulb for something else ..
Disinfect the bulbs by pouring over a few litres of boiling water.
Put the garlic in your sterilized jar , fill to the brim with rice vinegar ( about 0.4 litres , depending on how well they're packed) and screw the top on. Put it in a dark and cool place for two weeks.
After the two weeks ( this garlic will ferment as well , so open and close the top each week ),
remove about 2/3 of the vinegar and measure how much you have removed.
You can keep the vinegar to use in salads. The vinegar will smell of garlic, but surprisingly will only have a very light taste of garlic.
This vinegar will stay good for a very, very long time.
Pour the same amount of soy sauce, as of the vinegar you removed, into a bowl.
For every cup ( 250 ml ) of soy sauce, add about 1 tablespoon of sugar and mix well till the sugar dissolves. You can warm the soy up a bit to help dissolve the sugar , but don't boil it !
Pour the mixture on the garlic and close the top. Put away in a cool dark place or your refrigerator.
Now you wait for at least two months (yes! 2 months! ) before using the garlic. It will keep for a long time in a cool place : I have had some in the refrigerator for almost 2 years : the soy taste becomes stronger.
The pictures below were taken this summer and are of some I made last year.
Don't they look gorgeously mysterious in their dark marinade ? They do smell heavenly !
To use , fish out a bulb and cut it in half with a sharp knife. You can pick out separate cloves to use. The smell of the garlic cloves is a lot less than the fresh ones.
I especially like slicing one clove finely in the morning and mix it with a bit of the soy-vinegar and the raw egg in my Tamago kake gohan ( raw egg on rice ) instead of using soy sauce.
It tastes so much better than the 'ordinary' Tamago kake gohan.
To keep, you can simply put the leftover bulb back in the jar.
The ones below have been pickled for at least 4 months.
Half a bulb in the soy sauce-vinegar in a small glass jar makes for a very nice present too!
The final recipe is 'Ninniku Miso-zuke' ( garlic in miso)
Use about 6 bulbs or 250 grams of garlic.
Separate the cloves, cut off the root ends and peel them completely.
Put a pan of water ( 3 cm deep or so ) on the fire , large enough to hold all your cloves.
When the water boils , briefly cook the cloves ( about 2 minutes)
and drain them in a clean colander.
Mix 250 grams of yellow miso with 4 tablespoons of honmirin.
Sterilize a 500 ml jar and top ( as I described above )
and put a spoonful of miso mixture in the jar.
Add a spoonful of cloves and push them gently into the miso.
Keep adding layers of miso and cloves, making sure that the miso covers all the
cloves. The jar does not have to be full but make sure no cloves are above the miso.
Because you cooked the garlic, they'll taste less strong right away and the miso can get into the garlic more quickly. Keep it in the refrigerator and in a week you can start eating this.
I have never seen this tsukemono ferment, so leave the top on till you start using it.
The cloves can be served whole or sliced together with some of the miso.
The perfect accompaniment for your sake.
If this recipe has one disadvantage , it's that it tastes irresistibly good. Because of this I cannot tell you if it keeps longer than 3 months , because it's always eaten before 3 months are over...
I hope you'll try some ( or all) of these recipes at home.
(as always, click on the pictures to get a full size view)
It's one of my favourite herbs since forever, but I always have to throw away bulbs because they've gone bad or started to sprout.
That is , until I discovered tsukemono (literally : 'pickled things') : the japanese art of pickling vegetables and herbs. I'll be describing my three favourite recipes here.
Get the best dried garlic you can find : it'll be worth it in the end.! Preferably around autumn, when the harvest is, although you can buy good garlic all year round these days.
The first recipe is 'Ninniku Hachimitsu-zuke' ( Garlic in honey )
Use about 7 medium bulbs ( around 300 grams) of garlic
and about 250 grams of honey. I used Hungarian acacia, a liquid honey with a light taste.
You can try any honey you like , but a clear liquid one is easier to pour.
Don't EVER heat honey in the microwave to pour it, it will heat unevenly and start to lose its taste and flavour. Honey should be heated in hot water of about 40 degrees C , which is slow but won't affect the taste and flavour. When honey is heated to over 45 °C flavour and taste ( and the enzymes in the honey) are being damaged.
Separate the cloves, cut off the root ends and peel them completely. No need to remove the core.
Look for a glass jar that will hold all your cloves and sterilize it.
I always use an empty jar from honey (500 millilitres) like the one in the picture above and sterilize it and its plastic top at 110-120°C in the oven for 20 minutes.
Always put the jar and the screw-top in the cold oven before heating it up, so it has less of a chance to break. You can safely put a plastic top upside down in the oven too : at 120 °C it won't melt. Don't EVER screw the top on the jar : when the air in the glass jar heats up, it will push against the top and will deform it !
Take the glass jar from the oven and put it on a cloth or a wooden board so it won't break.
Pour a few litres of boiling water over your peeled cloves, to disinfect them. Make sure your hands
and all your equipment are completely clean !
Pat the cloves dry with a paper towel and put the cloves in the glass till it is full.
Pour the honey in , the cloves will start to float.
Shake the jar , so the honey flows all the way to the bottom.
Leave a little space at the top , so it doesn't overflow when you close it.
Ideally , when you screw the top on, very little air is left underneath the top.
Put the jar in a dark and cool place or in the refrigerator. It's best to put it on a little tray, because after the first weeks , the tsukemono will ferment and produce some gas, and some of the honey may drip over the edge.
Unscrew the top to let it out , once a week. I have on occasion forgotten this and only let it out after a month with no problem ,but the top was bulging and some honey had come out.
After a month, you can start using this garlic in your recipes.
It will taste a bit of honey , but still taste a lot like garlic, and it will not spoil.
The honey will become a bit darker and garlic flavoured. Mix a spoon in hot water , it's a wonderful drink on cold winter mornings.
Over time , the honey flavour of the cloves will get stronger and the garlic taste will become less strong.
Just to see what would happen, I once left a few cloves at room temperature in honey in the dark for a year.
The honey became quite dark, but was still tasty.
and the cloves had a very sweet honey taste with a hint of garlic , almost like candy.
The second recipe is 'Ninniku Shoyu-zuke' ( garlic in soy sauce )( and vinegar)
Use 7 to 8 medium bulbs ( or 10-12 smaller ones ) of the best garlic you can get and trim off the stems with a sharp knife. don't break them off : you could damage the cloves or break the bulbs.
Peel the skins off , carefully till only one skin remains. Don't worry if some final skin comes off or a bit of two layers remain ! Inspect you bulbs well and reject any that have damaged cloves.
Find a glass pot in which the bulbs will fit close together, otherwise you need too much soy sauce, and sterilize your glass jar and the jar top in the oven ( see above for the details).
This one is a perfect fit for seven bulbs with one on top.
I'll be using the leftover bulb for something else ..
Disinfect the bulbs by pouring over a few litres of boiling water.
Put the garlic in your sterilized jar , fill to the brim with rice vinegar ( about 0.4 litres , depending on how well they're packed) and screw the top on. Put it in a dark and cool place for two weeks.
After the two weeks ( this garlic will ferment as well , so open and close the top each week ),
remove about 2/3 of the vinegar and measure how much you have removed.
You can keep the vinegar to use in salads. The vinegar will smell of garlic, but surprisingly will only have a very light taste of garlic.
This vinegar will stay good for a very, very long time.
Pour the same amount of soy sauce, as of the vinegar you removed, into a bowl.
For every cup ( 250 ml ) of soy sauce, add about 1 tablespoon of sugar and mix well till the sugar dissolves. You can warm the soy up a bit to help dissolve the sugar , but don't boil it !
Pour the mixture on the garlic and close the top. Put away in a cool dark place or your refrigerator.
Now you wait for at least two months (yes! 2 months! ) before using the garlic. It will keep for a long time in a cool place : I have had some in the refrigerator for almost 2 years : the soy taste becomes stronger.
The pictures below were taken this summer and are of some I made last year.
Don't they look gorgeously mysterious in their dark marinade ? They do smell heavenly !
To use , fish out a bulb and cut it in half with a sharp knife. You can pick out separate cloves to use. The smell of the garlic cloves is a lot less than the fresh ones.
I especially like slicing one clove finely in the morning and mix it with a bit of the soy-vinegar and the raw egg in my Tamago kake gohan ( raw egg on rice ) instead of using soy sauce.
It tastes so much better than the 'ordinary' Tamago kake gohan.
To keep, you can simply put the leftover bulb back in the jar.
The ones below have been pickled for at least 4 months.
Half a bulb in the soy sauce-vinegar in a small glass jar makes for a very nice present too!
The final recipe is 'Ninniku Miso-zuke' ( garlic in miso)
Use about 6 bulbs or 250 grams of garlic.
Separate the cloves, cut off the root ends and peel them completely.
Put a pan of water ( 3 cm deep or so ) on the fire , large enough to hold all your cloves.
When the water boils , briefly cook the cloves ( about 2 minutes)
and drain them in a clean colander.
Mix 250 grams of yellow miso with 4 tablespoons of honmirin.
Sterilize a 500 ml jar and top ( as I described above )
and put a spoonful of miso mixture in the jar.
Add a spoonful of cloves and push them gently into the miso.
Keep adding layers of miso and cloves, making sure that the miso covers all the
cloves. The jar does not have to be full but make sure no cloves are above the miso.
Because you cooked the garlic, they'll taste less strong right away and the miso can get into the garlic more quickly. Keep it in the refrigerator and in a week you can start eating this.
I have never seen this tsukemono ferment, so leave the top on till you start using it.
The cloves can be served whole or sliced together with some of the miso.
The perfect accompaniment for your sake.
If this recipe has one disadvantage , it's that it tastes irresistibly good. Because of this I cannot tell you if it keeps longer than 3 months , because it's always eaten before 3 months are over...
I hope you'll try some ( or all) of these recipes at home.
(as always, click on the pictures to get a full size view)
Monday, 23 December 2013
Chicken with forty cloves of garlic
I've come across this fascinating ( FORTY cloves ! ) recipe more than once in the past in many cookbooks , always wondering what it would taste like and this weekend I finally made it happen.
A lot of versions of this traditional French recipe can be found on the internet, but I went for the most traditional one.
And for those who are too scared to try this : NO, your house or you will NOT smell of garlic for the next two months, in fact it hardly smells at all while cooking and you won't have garlic breath after eating it !
You'll need
one good 1,5 kg chicken ( don't buy a cheap one fed with fishmeal and 'ready to eat' in 12 weeks, buy a real chicken ! )
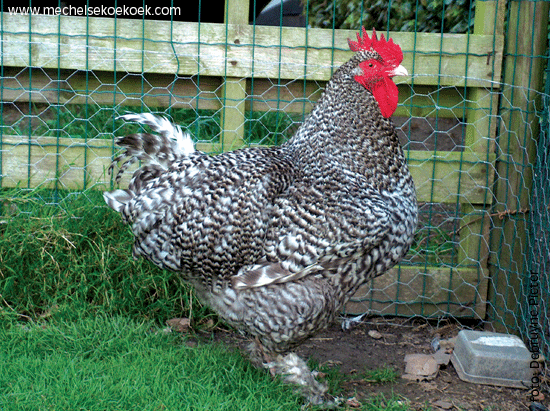
I used a Mechelse koekoek , which is a famous special Belgian breed (since 1898 ! ), known for good laying and tasty flesh. It's also known to be a good natured and well behaved breed.
( picture copyright www.mechelsekoekoek.com 2013-..)

By the way , the one in the picture is a rooster, who is way bigger than the chicken I used :)
4 spoons of olive oil
1 glass (250 cl ) of red wine ( or white wine )
4 or 5 bay leaves to put inside the chicken
About 3 whole garlic bulbs for your 40 cloves : cut the end off each clove and peel the cloves ( lots of recipes suggest unpeeled cloves and the cloves do get really soft, but they are much easier to handle after the cooking when they're peeled ).
When you start peeling , it's a good time to start preheating your oven to 180° C
Use an oven thermometer ! Almost all ovens lie ! Mine needs a setting of 205 to get to 180
I still had lots of garlic in honey ( one of my three garlic tsukemono ) so I decided to try adding 20 of these to see what they would taste like.
I rinsed off the honey : they still taste very much of garlic even after spending 3 months in honey, even though they look glazed.
Put the bay leaves in the chicken. Oil the chicken well, sprinkle with salt and pepper all over and put it in a solid iron pot. Put the remainder of the oil in the pot.
You could also use an earthenware or steel pot , I just 'happened' to have this robust pot so I can cook things over an open fire outside :)
Traditionally , to keep the steam inside , the lid is sealed to the pot with a ring of dough.
To make this, put 100 grams of plain flour in a pot and add about 40 grams of water to start.
Now you can finally use those kneading pins of your mixer !
Start mixing till all the flour has been absorbed and if required add water one spoonful at a time till you get a nice flexible dough that bounces back when you knead it. Knead for at least a minute more to make sure the dough is completely mixed through. You can also knead it by hand for a few minutes. If your dough is sticky , it's too wet : mix more flour into it.
Make sure your hands are clean and dry to roll the dough : no need to spread flour all over your tabletop ( and kitchen floor ^^ )!
Roll the dough into a large sausage that will go around the top of your pot.
That takes me about half a minute ^^ . The dough roll should be long enough to go around your pot with some overlap. Put it all around , so it hangs over the inside and the outside.
If it's too short , don't pull on it, it will spring back, just take it off and roll it a bit longer.
Put all the cloves around the chicken and don't forget to pour the wine in !
Put the lid on and press it down, so the seal is tight.
Put in the middle of the oven and cook for about 1 and a half hours ( or 1 and three quarters if you have a ceramic pot) at 180 degrees C (measured with a thermometer).
It will look like this : the dough seal is all hardened.
Pry the lid off : a delicate smell of moist , soft chicken comes wafting out. The skin will be totally soft ( here it even opened up , which tells me it's well done ! )
Take the chicken out and carve it up , whichever way you like.
Pour the sauce in a sauce pot : there's a lot of fat riding on top of it , which you can skim off if you like it less fatty.
The sauce taste very nice , make sure everyone at the table gets some !
Because I used red wine , it turned a rather bland grey brown , but the garlic and wine flavour is very subdued, not what you would expect after using forty cloves.
I put some of it in a white bowl for this photograph, you can see the fat on top. It looks a bit more grey in real life ^^.
Carefully lift out the cloves with a spoon : they are very soft. ( the purple spots are from the red wine I used )
To eat with your chicken , put them on bread ( French baguette or whatever bread you like )
( the orange one on the left is one of my honey tsukemono garlic cloves : it still has a lightly sweet flavour, which I find interesting)
They are so soft , you can spread them out with a spoon.
Dip your bread in the sauce, it's heavenly !
You can serve this chicken with some steamed green beans , if you want some vegetables with it. Personally I prefer to have a nice vegetable soup as a starter.
The delicate garlic flavour was a surprise to me : maybe next time I'll try a 100 cloves.
A lot of versions of this traditional French recipe can be found on the internet, but I went for the most traditional one.
And for those who are too scared to try this : NO, your house or you will NOT smell of garlic for the next two months, in fact it hardly smells at all while cooking and you won't have garlic breath after eating it !
You'll need
one good 1,5 kg chicken ( don't buy a cheap one fed with fishmeal and 'ready to eat' in 12 weeks, buy a real chicken ! )
I used a Mechelse koekoek , which is a famous special Belgian breed (since 1898 ! ), known for good laying and tasty flesh. It's also known to be a good natured and well behaved breed.
( picture copyright www.mechelsekoekoek.com 2013-..)

By the way , the one in the picture is a rooster, who is way bigger than the chicken I used :)
4 spoons of olive oil
1 glass (250 cl ) of red wine ( or white wine )
4 or 5 bay leaves to put inside the chicken
About 3 whole garlic bulbs for your 40 cloves : cut the end off each clove and peel the cloves ( lots of recipes suggest unpeeled cloves and the cloves do get really soft, but they are much easier to handle after the cooking when they're peeled ).
When you start peeling , it's a good time to start preheating your oven to 180° C
Use an oven thermometer ! Almost all ovens lie ! Mine needs a setting of 205 to get to 180
I still had lots of garlic in honey ( one of my three garlic tsukemono ) so I decided to try adding 20 of these to see what they would taste like.
I rinsed off the honey : they still taste very much of garlic even after spending 3 months in honey, even though they look glazed.
Put the bay leaves in the chicken. Oil the chicken well, sprinkle with salt and pepper all over and put it in a solid iron pot. Put the remainder of the oil in the pot.
You could also use an earthenware or steel pot , I just 'happened' to have this robust pot so I can cook things over an open fire outside :)
Traditionally , to keep the steam inside , the lid is sealed to the pot with a ring of dough.
To make this, put 100 grams of plain flour in a pot and add about 40 grams of water to start.
Now you can finally use those kneading pins of your mixer !
Start mixing till all the flour has been absorbed and if required add water one spoonful at a time till you get a nice flexible dough that bounces back when you knead it. Knead for at least a minute more to make sure the dough is completely mixed through. You can also knead it by hand for a few minutes. If your dough is sticky , it's too wet : mix more flour into it.
Make sure your hands are clean and dry to roll the dough : no need to spread flour all over your tabletop ( and kitchen floor ^^ )!
Roll the dough into a large sausage that will go around the top of your pot.
That takes me about half a minute ^^ . The dough roll should be long enough to go around your pot with some overlap. Put it all around , so it hangs over the inside and the outside.
If it's too short , don't pull on it, it will spring back, just take it off and roll it a bit longer.
Put all the cloves around the chicken and don't forget to pour the wine in !
Put the lid on and press it down, so the seal is tight.
Put in the middle of the oven and cook for about 1 and a half hours ( or 1 and three quarters if you have a ceramic pot) at 180 degrees C (measured with a thermometer).
It will look like this : the dough seal is all hardened.
Pry the lid off : a delicate smell of moist , soft chicken comes wafting out. The skin will be totally soft ( here it even opened up , which tells me it's well done ! )
Take the chicken out and carve it up , whichever way you like.
Pour the sauce in a sauce pot : there's a lot of fat riding on top of it , which you can skim off if you like it less fatty.
The sauce taste very nice , make sure everyone at the table gets some !
Because I used red wine , it turned a rather bland grey brown , but the garlic and wine flavour is very subdued, not what you would expect after using forty cloves.
I put some of it in a white bowl for this photograph, you can see the fat on top. It looks a bit more grey in real life ^^.
Carefully lift out the cloves with a spoon : they are very soft. ( the purple spots are from the red wine I used )
To eat with your chicken , put them on bread ( French baguette or whatever bread you like )
( the orange one on the left is one of my honey tsukemono garlic cloves : it still has a lightly sweet flavour, which I find interesting)
They are so soft , you can spread them out with a spoon.
Dip your bread in the sauce, it's heavenly !
You can serve this chicken with some steamed green beans , if you want some vegetables with it. Personally I prefer to have a nice vegetable soup as a starter.
The delicate garlic flavour was a surprise to me : maybe next time I'll try a 100 cloves.
Subscribe to:
Posts (Atom)